Leica DMIL LED Windows 10 Update
January 2020
There are several Leica DMIL-LED cell culture microscopes at the BMC. About half of them have a camera that is coupled to a computer. This page describes how to update these computers from Windows 7 to Windows 10. It is an abbreviated and specialized version of that page. For general considerations, 'why?' and for other Leica microscope computers see there. The following procedure is recommended by the Core Facility Bioimaging but no warranties are implied. It is just the way that worked for our two cell culture microscopes. Of course you can develop your own procedure. Its your microscope.
If you do not wish to update to Windows 10, please disconnect the computer from the Network since it is a security hazard if it runs Windows 7. It may be reconnected when it is assigned to the Gerätenetzwerk if you are behind the BMC firewall. If so, your EDVB can do this assignment.
The first three paragraphs are more or less independent, the order does not matter.
Preparing a USB stick with the Windows update files
You need the iso files for Windows 10 LTSB 2015 and Windows 10 LTSC 2019. Some combinations work, others don't. Best use these:
SW_DVD5_WIN_ENT_LTSB_10_2015_64BIT_English_MLF_X20-26562.ISO
SW_DVD5_WIN_ENT_LTSC_2019_64BIT_English_-2_MLF_X22-05056.ISO
Your EDVB can find these isos at nas.ads.mwn.de\bmc\edvb\Windows 10.
You also need a bootable USB stick which you can prepare on any Windows computer. One way of getting it is to run Microsoft's Media Creation Tool for any Windows version and delete all files on the stick. Then copy all data from the mounted iso file to the root directory of the stick (4 files, 4 folders).
General preparations on the Leica computer
- Make a complete backup of the system partition with your favorite backup program. Just in case something goes wrong badly.
- Optional: Delete user accounts not needed any more.
- Optional: Search for image files and other giant files on user desktops. For this I use "Scanner" developed by Steffen Gerlach. A small tool that runs without installation and shows the occupation of the disk in a nice graph.
- Uninstall unneeded software. Here it is Sophos antivirus software, since Win10 comes with Defender. Also, anti-virus software might interfere with the system update. The requested reboot afterwards is required, otherwise the LASX installation below may fail. If present uninstall Microsoft Teams, which seems to occupy ~200 Mbyte of data for every user that has logged in since its automatic installation in fall 2019.
- Create a new account with administrator rights. The account "administrator" is hidden by Windows 10, so it cannot easily be used. I suggest something with an a, so that it will be at the beginning of the account list and easier to find (like adminlocal).
- Optional: In the File Explorer, right-click on C:\ and select Properties. Click on disk cleanup, let it search, and delete what is expendable.
- In the device manager check the "Renesas Electronic USB 3.0 Host controller" and note its location (e.g. PCI slot 3). This will allow identification of the controller after the upgrade, should the Renesas driver not install automatically.
Installation of LAS-X
The old Leica LAS software is not officially supported under Windows 10 and may or may not work. If it does, it may stop working with a future Windows update.
Install the current Leica LAS-X version for widefield systems on the computer (as of Nov 2019 this is 3.7.0.20979). You can get installation files for this version from Steffen Dietzel. No dongle is needed to take pictures with the camera.
If you deinstalled Sophos (see above) it is important that you reboot the computer or the LAS-X installation will not complete successfully. (In that case you may have to deinstall LAS-X, reboot and start over.) Start the LAS-X installation and always go with the default selections.
After Installation check in the device manager if the Camera is recognized. Under Leica USB3 devices, the DFC300G must not have a yellow warning sign. If it has a warning sign, update Windows 7 with all "important updates" (You will need an internet connection for this). Afterwards the warning sign should be gone.
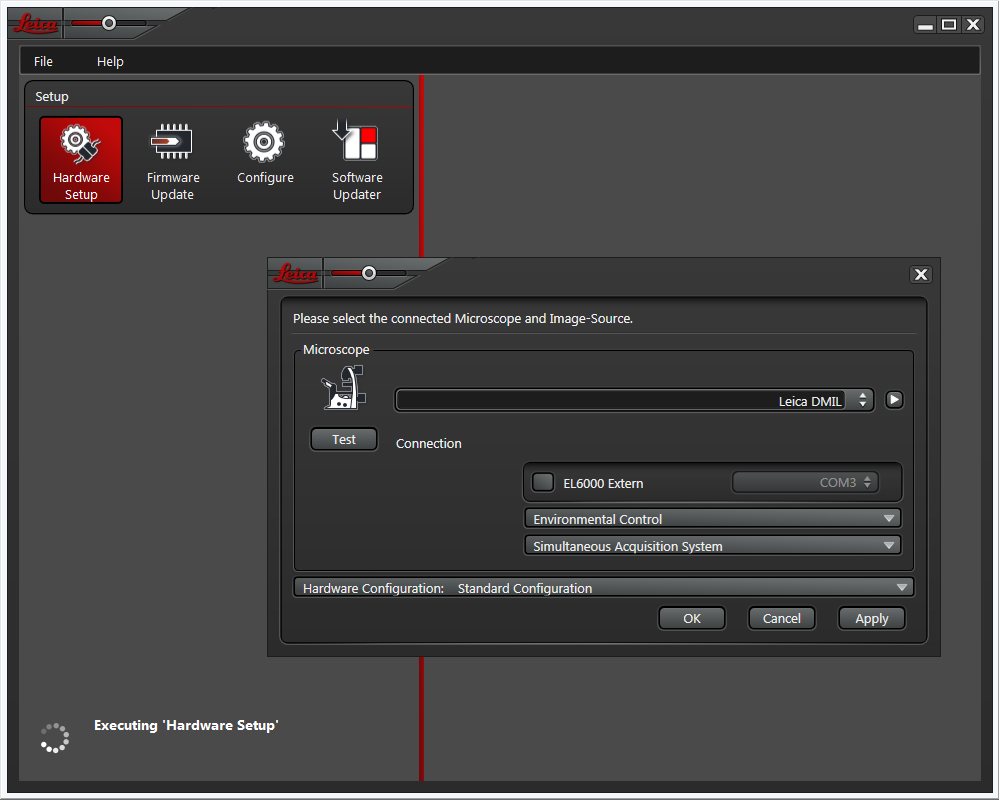
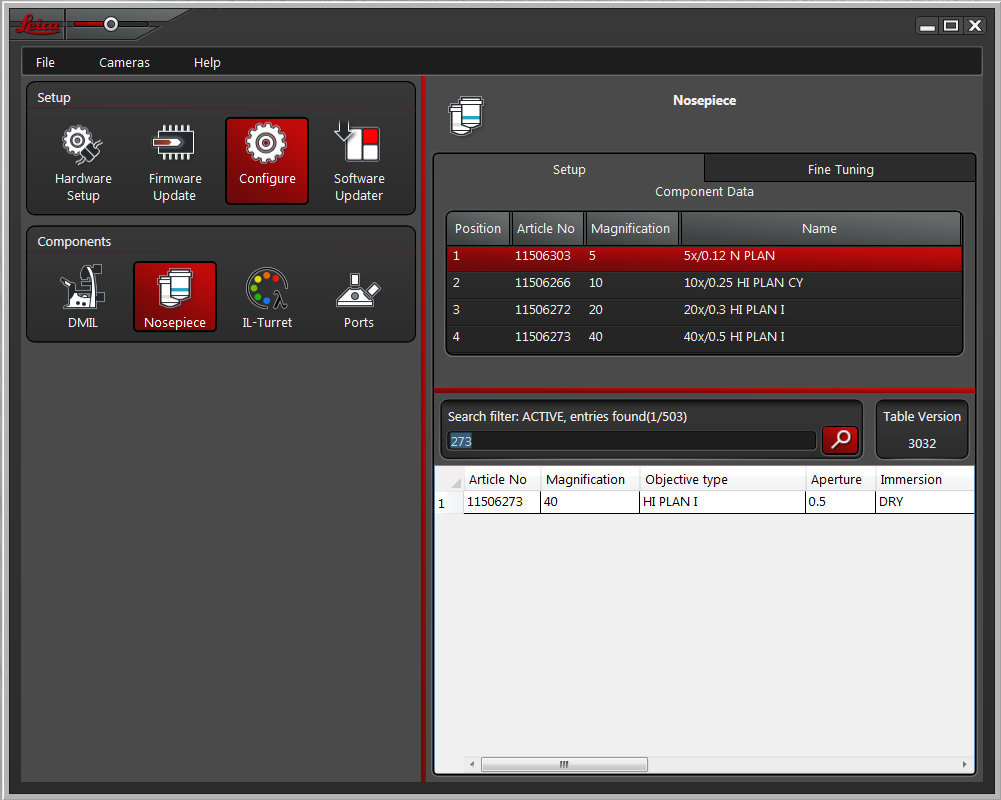
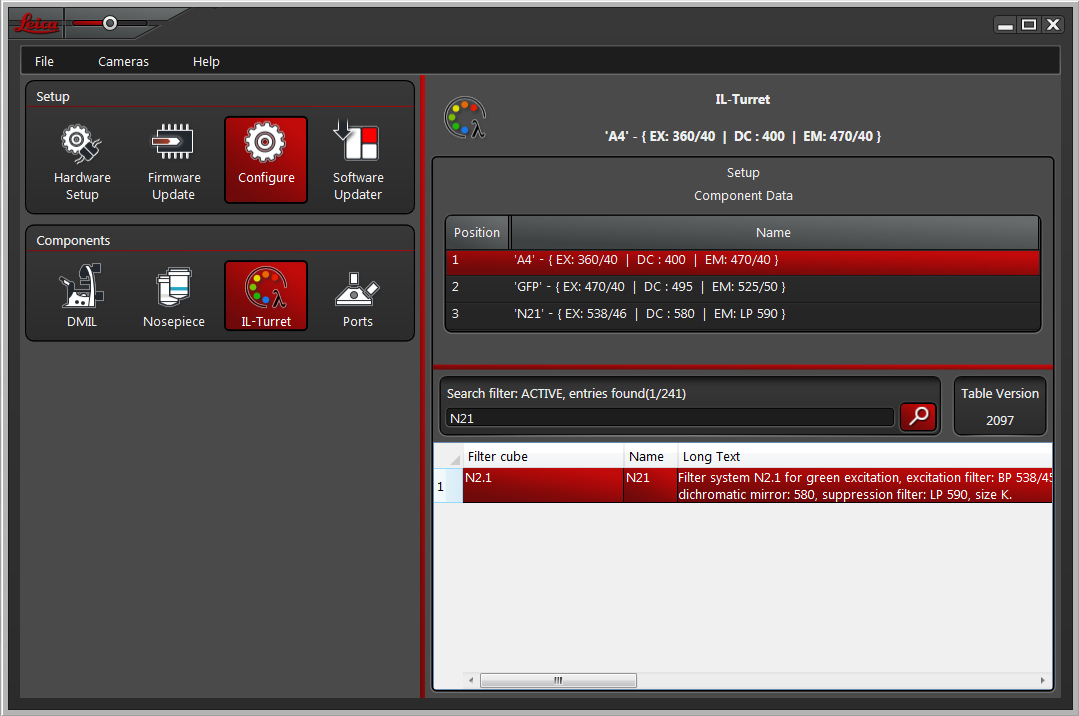
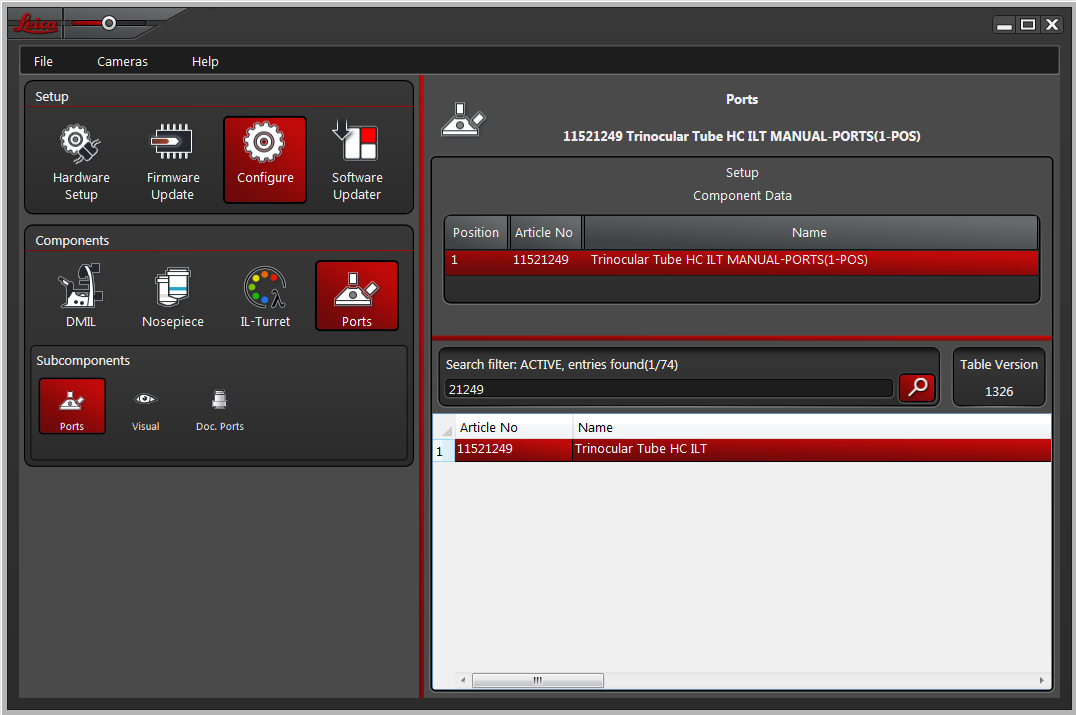
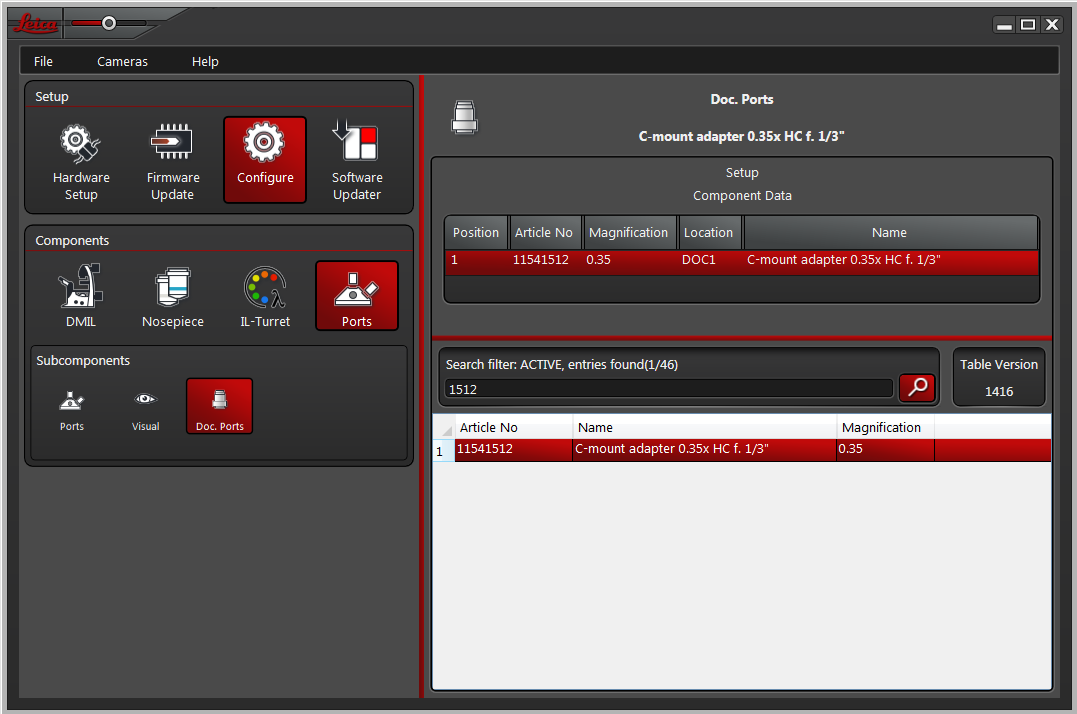
Start the Leica Hardware Setup (The icon with the gear wheel). Provided that you have the standard BMC cell culture setup, check that settings are as in the following images or select the respective values.
For the following menus it is easiest to enter the last three digits of the article number in the search box. Then double-click on the correct item to pick it for the selected position.
The following camera menu appears only after the previous port is set up. You may have to switch to Hardware Setup and back to Configure in the main menu to see the camera menu. If you see the camera menu, but the DFC3000G is not listed, you probably did not install the latest Windows 7 updates as described above. 
Start LAS-X and check if it can take an image with the camera.
Update to LTSB 2015
- From within Win 7, start the update program on the USB stick. Do not boot from USB stick, or the old system will be erased (and not updated).
- Select "Keep personal files, apps and Windows settings" (default)
- Do not search for updates and drivers since when done, the update to LTSC 2019 will follow.
- Wait a long time....
Ideally, the update should progress automatically to a request to enter the password and the privacy settings. But depending on BIOS configuration, the system might boot accidentally from the USB stick. If that happens you get the following dialogs:
- Language to install: English is the only option. Time + Currency: Germany. Keyboard: German.
- If you continue (but see below), you will go through: Install now, accept, upgrade.
- When done, it says: "The computer started using installation media....". Remove the USB stick(!), select "close".
This can be aborted by removing the USB stick and closing the window. Click on the red closing cross in the top right corner of window. "Sure to cancel?" yes. A reboot from hard disk occurs and an "Upgrading Windows" screen appears and runs from 1 to 100%. Wait a long time...
- When arriving at the privacy settings, set all to off and ok. Windows will reboot.
- After login with the new admin account (see above) the keyboard is set to English (instead of German). The screen resolution is horrible, but the next Update is to follow anyway.
Update to LTSC 2019
- If not yet done, boot from hard disk and log in with the new admin account.
- Put a USB stick with the update files for LTSC 2019 in the root directory in the computer. (The files for LTSB2015 may be kept in a subdirectory if the stick is large enough.)
- Start the upgrade to LTSC 2019.
- Warning "If you continue you can't go back to Win 7". Click yes. (You have the backup, right?). It appears that the files necessary for going back are indeed immediately deleted after clicking ok.
- Download updates and drivers? yes. Or no. Selecting yes may cause a delay of an hour or so at this point (only minutes on another system). If you select no, it will take longer to download the updates after the installation.
- You may get a dialog: "Select image". 10 LTSC en-us, the one without the N would be the right one.
- Wait... (checking for updates, Please wait...)
- Ready to install. Keep personal files and apps. Klick install
- Wait a long time....
- Again, the machine may boot from USB during installation. If so, an irritating message pops up: "It looks as if you ... booted from installation media". Remove USB stick and click "Yes". An automatic reboot leads to the message "Working on updates. This will take a while." And it does.
- Eventually the Windows 10 login screen comes up. Log in with the admin account. Say 'no' to all privacy settings.
Activate and update Windows
See our computing center web site for details.
- Open power shell or command prompt "as administrator" (right click icon to get there) and enter:
- cscript \windows\system32\slmgr.vbs -skms mskms19.lic.lrz.de
- cscript \windows\system32\slmgr.vbs -ato
- Both commands should give positive feedback.
- Check for Windows updates and install them. Reboot. Check for updates again, reboot if required. Repeat until no more updates are found. During downloads, you can go through the next two paragraphs.
Fix Language Settings and Keyboard driver
Goal: Display settings in English-US but German keyboard and time settings.
- Go to Windows settings - Time & Language - Language. You should see "Display language English (United States)" and further down English and German should be listed. If not, add a language. The last added will become display language. You might have to deinstall and reinstall English (US) to make it the display language.
- Still in the Language window, on the right side go on spelling, typing & keyboard settings. At the bottom of the new window, select Advanced Keyboard settings. In the new window, from the drop down menu select "German (Germany)" to make German keyboard layout the default.
- Back in the Language window, on the left select "Region". The value for "Country and Region" can be Germany, but the "Regional format" should be "English (United States). At the bottom click on Change data format and select: Short date: 05-Apr-17. Short time: 09:40. Long time: 09:40:07
- Back in the Language window, select Administrative language settings (right side). In new window click on copy settings. The current user should show: Display: English US, Input: German, Format: English US. If so, select copy to "Welcome Screen" and "New user accounts".
Clean up
- In the device manager check date of display adapter driver. Depending on its age, you may want to update the driver.
- In the device manager check for non-recognized hardware (this did not actually happen so far).
- Make Firefox default browser.
- In File Explorer menu View-Options-View, show file extensions and hidden files (this is the admin account.)
- Check that Defender is working. "Checks apps and files" may be of off. Definitions may have to be updated manually. Or install another anti-virus program if you prefer.
Testing
- Only after all available Windows updates are installed, start LAS-X and check that the camera is working.