Installation of ultraVNC
UltraVNC
UVNC is a remote desktop software. Like Teamviewer or other similar programs it allows to share the computer screen of a user with a remote computer. In our case, the microscope computer is the server, an office computer runs the viewer. Thus remote support can be given to microscope users. UltraVNC is free for all usage and under the GPL. The following assumes that both computers are behind our firewall.
Installation
We use UltraVNC_1_2_40_X64_Setup.exe downloaded from the project's download site.
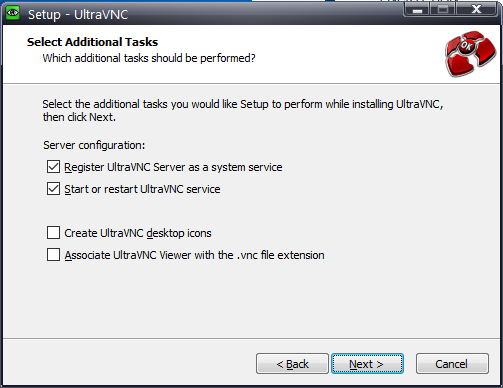
During installation on the microscope computer (!) select "Register uVNC as a system service" and "start ... service" as in the image below. This allows to start a remote session without needing the user to do anything (except agreeing to it, see below). No need to register uVNC as a service on the office computer that will run the viewer.
Setup of the microscope computer
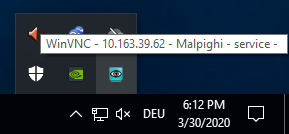
After installation on the microscope computer, still as admin, go to the lower right corner of the screen, right-click the uVNC icon (eye with cyan background) and select "admin properties" (2nd entry).
The following window comes up:
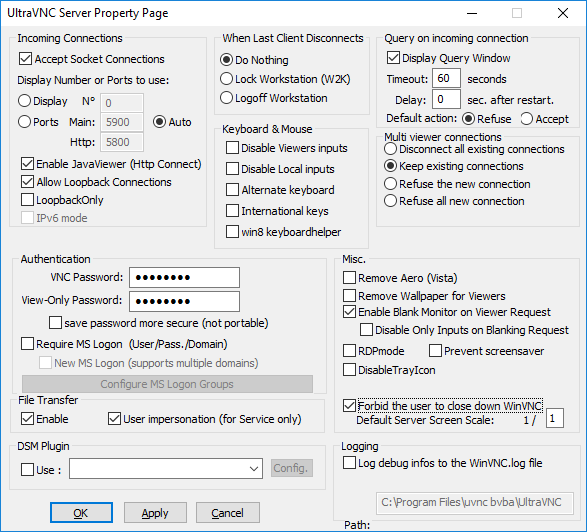
Change the following settings in this window as shown in the image:
- Enter both passwords
- Select "Display Query Window"! Otherwise the user would not get notified that a uVNC session is taking place and undetected spying would be possible. That would probably be an illegal configuration in most countries. Set the timeout to 60 s. This should allow walking from one room to another for testing.
- "Keep existing connections" (allowing log in from more than one computer in parallel, enables support by more than one person).
- "Forbid the user to close down WinVNC" to avoid accidental termination by unexperienced users.
The microscope computer is now ready for remote login.
On the remote (office) computer
For installation see above. Since most microscope computers have a 4k display, this will work reasonably well only if the office computer also has a big display.
- Start UltraVMC Viewer from the start menu. Not a program with a similar name or with extension in brackets.
- In the new window, enter the name of the server: name.physiol.med.uni-muenchen.de. The IP address also works. As can be seen above, the current IP can be seen while hovering over the uvnc icon in the task bar. The IP may change however from time to time.
- In the next window, enter the "VNC password" as set in the server configuration above and click Log On.
- Tell the user at the microscope computer (over the phone) to accept the new connection by clicking on the pop-up window on her/his screen.
- If desired, the microscope user can see that the connection is established by checking the color of the uVNC icon: it changes from cyan to yellow.
- Make the remote session as big as possible. The second icon toggles full screen mode.
- If the screen resolution of the microscope computer is as big or bigger than the one of the office computer (the usual case): In the menu of the viewer window click on the 3rd icon "Connection options" and select "scale to window". Otherwise, it will be very difficult to reach the task bar of the server to e.g. start an explorer window.
- There is a chat function (rightmost icon), but the recommended way of communication is via phone.
- A webcam connected to the microscope computer can be used to show the situation at the microscope.
- At the end of the session, again click on the second icon to get out of full screen mode, then close the window in the top right corner.
- Tell the user that you logged off. If desired, s/he can confirm by checking the icon color.