How to measure laser power
This document describes how to measure the laser power in one of our Leica SP8 microscopes.
Material
Power meter Ophir Nova II (in the small black suitcase) and one of the two heads:
- High power head, 2 mW - 12 W, Ophir 12A-V1, spectral range 190 nm - 20 µm. Thermal sensor. The big and round one.
- Low power head, <10 mW only, (some wavelengths can be more intense, see spec sheet for details). Ophir PD300, spectral range 350 - 1100 nm. Photodiode sensor, the small and rectangular one.
Procedure
- Switch the microscope on, start the software and enable the lasers. Wait 30 min for laser warm up.
- Laser power is usually measured without objective, placing the power meter head on the stage, so remove the objective. Careful: Do not remove the objective turret (revolver) while the microscope is switched on! Else, its electrical circuit will be damaged.
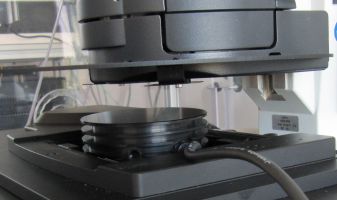
- Select the right head for the power meter (see above), connect it to the main unit and put it under the microscope. The high power head is typically about 5 cm away from the screw thread of the objective holder (in z), but the exact distance does not matter much, since we are in the infinity beam path.
- In the microscope software, click on 'Live' to create one image. Click 'Stop' right afterwards.
- Select "Bleachpoint: ON"
- Above the image, select the 'Point' button and set the bleach point at about the center of the image by clicking there. This will cause the laser beam to remain still at one site.
- In the left-most part of the software, go to the "Bleach Points" menu and select "Duration 100 Minutes" or something else long enough.
- Make sure the power meter is set to the correct wavelength. With the high power head, the range is either above or below 800 nm.
- In the microscope software, open the required shutters, make sure beam splitters are set correctly (if applicable) and set the AOTF to the desired value. You might want to start with a visible wavelength at low power until everything is set up. Click on "Start" to start the procedure.
- With visible lasers, you now should see light on the power meter head and the power meter should show an increased reading.
- Move the stage in x and y direction to find the position where the intensity is highest. Write down the value that is displayed on the power meter: This is your result.
- To perform a measurement at a different output power (changing the AOM or AOTF) or wavelength, you have to stop and restart the 'bleaching' in the software, or the different settings will not come into effect.
- Note that neither AOTFs nor AOM (used for multi-photon laser attenuation) are linear over the whole range. This non-linear behavior may be different at different wavelengths.
Specifics for multi-photon instruments (Göppert and Hooke)
To test the multi-photon laser, make sure the MFP is set right: "815" for wavelengths above 820 nm, "665" for everything shorter. For some wavelengths the power will differ substantially if the wrong MFP is used. If you change from one to the other, the brightest spot may change to a different position, so readjust the xy-position. Beam splitter should be substrate or empty.
For vis lasers, make sure the BS is set to TD488/552/638.
Specifics for SP8 STED (Kellner)
To test the STED-lasers, the STED objective must be screwed out. The high power head must be clamped at the second ring into a special stage insert as shown in the pictures.